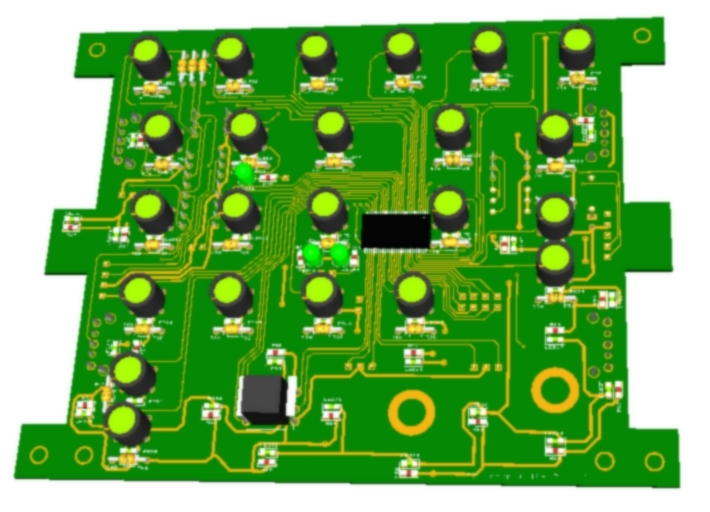
Vibration motors
The vibration motors are driven by means of 6 on/off signals and 4 speed signals. With this configuration you can use the vibration motor pcb.
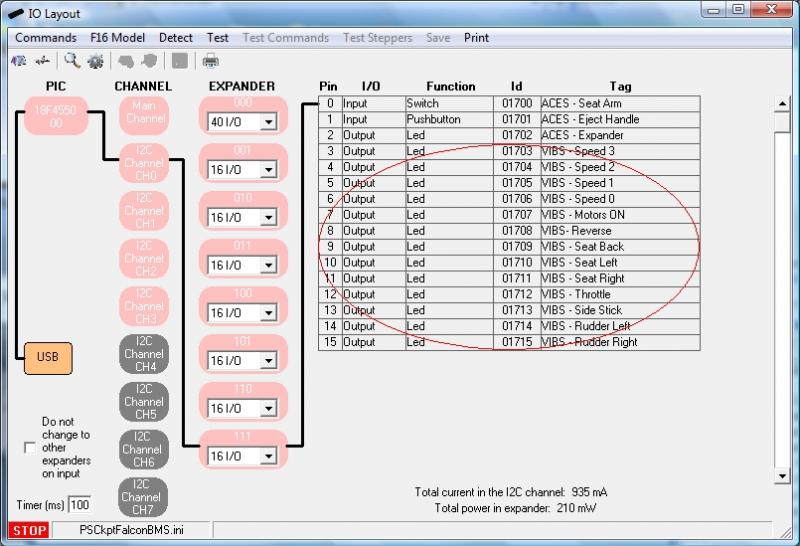
To configure the vibration motors in the PSCockpit Software go to IOLayout and select Leds as ouputs. You will have to define the following outputs:
- (4) for speed signals
- (1) for general ON signal
- (x) for the individual ON/OFF motor signals
You can test your outputs, as usual, by clicking on “Test” command and activating the proper checkbox.
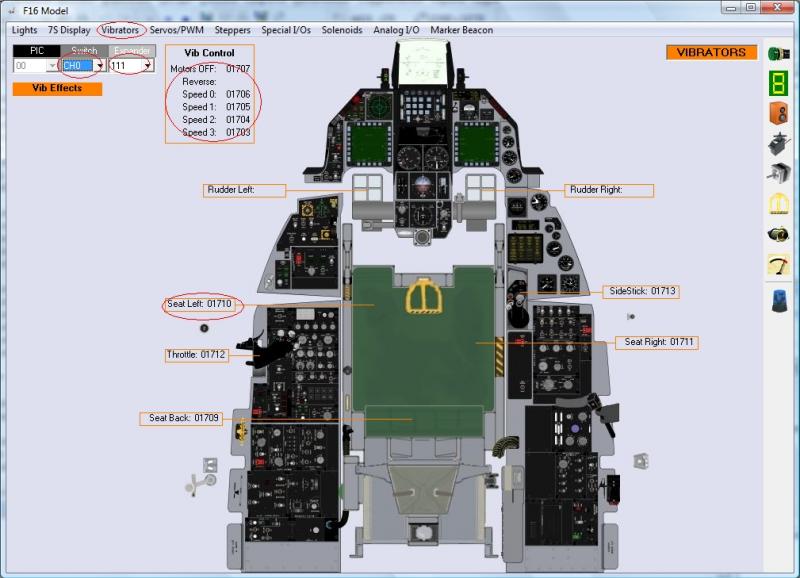
Now that we have defined the outputs, we have to tell the PSCockpit Software the function of each output. This is done in the “F16 Model” page, under the tab “Vibrators”. Just select in each position the correct Id of the output previously introduced:
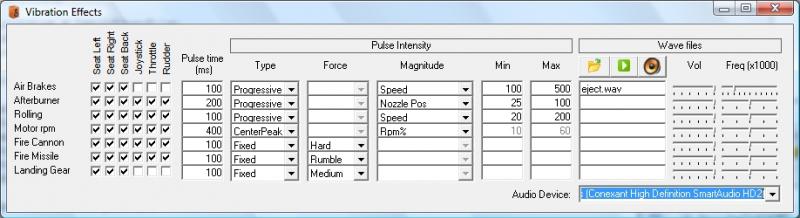
The next step is to select the behaviour of the vibrator motors depending on the variables of the sim. To do this go to “Vibs Effects” from this page or from the Main Page of the PSCockpit Software. The following screen will be opened:
The actual variables of the sim that can be programmed are the following:
- Air brakes: becomes active when the airbrakes are deployed
- Afterburner: becomes active when the afterburner is reached
- Rolling: becomes active when you are on the ground
- Motor rpm: self explanatory.
- Fire Cannon: becomes active when you push fire cannon button of your joystick.
- Fire Missile: becomes active when you push fire missile button of your joystick.
- Landing Gear: becomes active while the landing gear is in extension/retraction movement.
Select in each checkbox what motors you would like to activate when a sim variable becomes active.
To define the pulse intensity you can define the following variables:
Type:
- Fixed: The pulse intensity is always the same.
- Progressive: The pulse intensity begins from Min. to Max. defined later
- Center peak: The pulse reaches the highest intensity in the middle of Min. and Max.
Force. If you have selected a fixed type, you can establish the force level:
- Off: No motor will be activated
- Slight: Speed 0 will be activated.
- Rumble: Speed 1 will be activated.
- Medium: Speed 2 will be activated.
- Hard: Speed 3 will be activated.
Magnitude: If you have selected a Center Peak or Progressive type, you can select one of the following sim varables:
- RMP%
- Speed
- RMPxSpeed
- Nozzle Pos
- Fuel Flow
Min. and Max: The values of these variables should match the selected magnitude variable and also will define the interval when the motors will be active.
Depending on all the above values the software will determine what motor speed output will be activated.
To assign the joystick buttons for cannon and missile fire go to “Joystick” page and assign the desire buttons:

Two examples:
- I would like to feel the runaway while taking off or landing, so I have selected the Rolling variable to activate all the vibrators in a progressive manner, depending on the speed from 20 to 200 knots. In this way as the speed on the runaways increases the vibration increase and will stop when the speed reaches 200 knots which will be when the wheels leave the runaway.
- While on Ramp Start, I would like to feel how the motor begins to turn, so I have selected the Motor RPM to activate all the vibrators in a center peak manner, depending on RPM% from 10 to 60% rpm. In this way, when I push on the Start 1 switch, the vibrators will begin in slight mode and when I move the throttle forward I will feel how the vibration increases up to 30% rpm and will decrease until 60% when it supposed the motor reaches the nominal rpm. Just like starting the motor of you car!
I have to tell you that these effects are simply amazing!!

Wave files
The way the wave files are treated is the same as the vibrator motors but the software changes the volume of the sound.
To select a wave file put the cursor in the desire text box and click on the Open File icon. Then select the .wav file. They must be saved on your PSCockpit directory.
To test a .wav file, put the cursor on the desired text box and click on the Play icon.
You can change the volume and the frequency of the .wav file to adjust anyhow your bass shaker. The PSCockpit software will change the volume from this selected volume.
If you have more than one Audio device you can select in which one the .wav will be sent to by selecting the correct one in the display list “Audio Device”.
Be aware that in a PC the back and front sound outputs are handled by the same audio device, but you can use your back/front sound output for bass shakers and have a USB headphones for team speak.
Regards,
Shep