To properly run the Main Board, take in account these general considerations:
MAIN BOARD DETECTION
If PSCockpit Main Board is not detected in PSCockpit software, check for driver issues. The USB port where PSCockpit Main Board is connected should have only its own driver. You can follow this procedure:
If some expanders are not detected in PSCockpit software, follow this procedure:
- Run PSCockpit software with Admin rights.
- Close PSCockpit software, disconnect the USB cable from the PC and turn off the Main Board and wait a few seconds in every test. If there is a leakage in any board, the Main Board chip can go to sleep mode in case of not enough voltage.
- Follow this startup sequence: Power on Main Board, connect USB cable to your PC and enter PSCockpit software.
- Select one USB port (2.0 preferred) for PSCockpit Main Board and try not to connect any other device on that USB port.
- Displays&Gauges and PSCockpit Main Board should have their own USB port and never interchange them.
- Power Analogue and Aircore Controller expanders at the same time that the Main Board.
MAIN BOARD DETECTION
If PSCockpit Main Board is not detected in PSCockpit software, check for driver issues. The USB port where PSCockpit Main Board is connected should have only its own driver. You can follow this procedure:
- Close PSCockpit Software
- Download and install USBDeview USBDeview: Link
- Disconnect all USB devices from your computer, including PSCockpit Main board.
- Open USBDeview with Administrator rights
- Uninstall all the drivers. No worries, as soon as you reconnect your devices the controllers will be loaded again automatically.
- Reset PSCockpit Main Board by powering OFF and ON
- Connect PSCocktpit Main board to your computer to an USB 2.0 port
- Look in to USBDeview for PSCockpit controller
- Open PSCockpit Software and check the bottom left LED is green (Main Board Status)
- Goto IOLayout and click Detect. All detected expanders must be orange.
If some expanders are not detected in PSCockpit software, follow this procedure:
- Disconnect all the expanders from the Main Board
- Check all the expanders one at a time to see if any of them is causing the problem
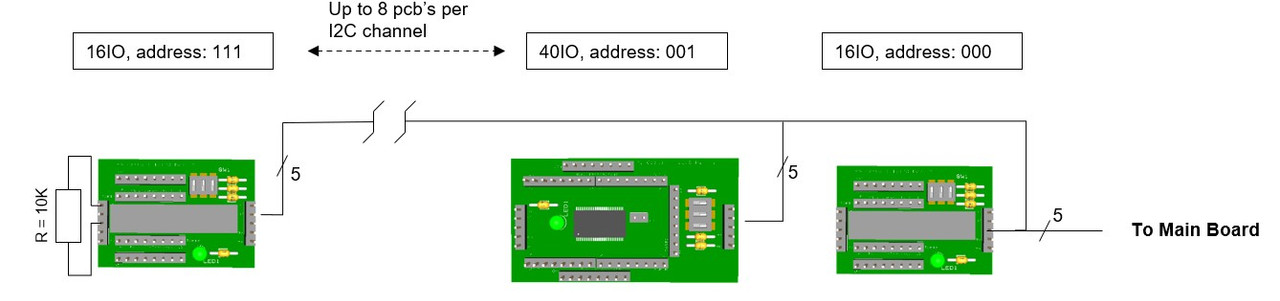
- Double check the hardware addresses of your boards. You can set the expander type you want to test in all the addresses of the I/O Layout page at a given I2C channel, connect the expander at that I2C channel then, and click on “Detect”. The real address of the expander will be painted in orange. Check that the one in orange has the components configured as the expander you have connected. If you test one output where you have connected physically an input, it may damage the board.
- If all the expanders are working as expected one by one but when you connect all at a time the system doesn’t work, you may have either a lack of power supply (you will need to add another power supply or change it with a more powerful one) or the wires are excessively long. In this last case you can apply power directly from the power supply to any of your farthest boards.
RANDOM DISCONNECTIONS AND/OR SWITCHES ACTIVATING THEMSELVES
This issue is related with a loss of power in some point of the system.
Check any of these four possible situations:
1. Faulty device:
If the loss of power is related with a faulty device means that is draining current to ground.
You can troubleshoot this issue by connecting the I2C channels one by one and test all the devices connected to the boards. If one of them is faulty, either the I2C channel or one of the pcbs will stop working.
Once you have isolated the expander, check the connections and welds of all the devices connected to that expander. Check also that the expander and the screws supporting the expander do not touch any welded part of the board.
2. Current requirement exceeds the maximum allowed current in one of the I2C channels:
The I2C channels powered from the Main Board with the pcbs connected in daisy chain have some current constrains depending on the wire (length and thickness) or it might happen that, in a given moment, one or several devices connected to an I2C channel are requiring more power at once, exceeding the maximum current: i.e. the seven segment displays require more power when they show the "8" digit than when they show the "1" digit.
To solve this issue, you can always power any of the pcbs in the daisy chain directly from the power supply using the existing +5V and GND pins. Look for the pcbs with higher power requirement and/or further position in the daisy chain. Take a close look at the 40I/O boards with all their pins configured as outputs.
3. Lack of power of your power supply:
If any of the above solutions didn't work, you might think that your power supply is not powerful enough. You can either change the power supply with a powerful one or add another one in parallel. In this case, don't forget to connect both commons with a thick wire.
4. Interferences or low voltage in the I2C wires:
To avoid this situation you can make the I2C daisy chain directly in the connectors bypassing the pcbs. This will make the I2C channel signals stronger and connecting the chips directly to the Main Board avoiding any restriction or interference that could happen at the pcbs. The daisy chain will show as:
You can use the free connectors left in the pcbs to give power from the power supply to avoid point 2.
PSCOCKPIT and DCS
Regards,
Shep