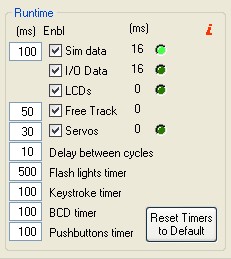
You can access the Runtime and Timers by clicking on “USB Timers”:
Sim Data Timer
The first timer is the Sim Data Timer and controls the Sim Data, I/O Data and LCDs routines where the following operations are made:
- Sim data: the data is read from the simulator.
- I/O Data: if the expanders aren’t polled in “Exp. Interrupt” mode, the inputs from the pcb’s are read and the commands are sent to the simulator. Then, the outputs of the pcb’s are set. if the expanders are polled in “Exp. Interrupt” mode, the commands are sent as soon as they are received from the Main Board.
- LCD`s: the data of the LCD’s is sent to the Main Board.
The third column shows the time in milliseconds that the program takes to complete each subroutine and the led indication shows in which subroutine the program is.
The elapsed time showed beside Sim Data is the total time to complete a cycle and includes the subroutine times and the delay between cycles.
In case you are suffering any delay retrieving data from the simulator or from your pcb’s, you can check what routine is taken the most time to complete and deactivate it to review the behavior of all the other subroutines.
Free Track Timer
This timer controls the time the subroutine is ran to get the data from the Free Track. Free Track in PSCockpit is used to control the projector movement and/or the side views of your simulator. In this way, you can configure when to change to a certain view in your simulator depending on the Free Track data. Unchecking this checkbox avoid the program to enter the subroutine but does not deactivate the use of Free Track. If you want to deactivate Free Track, enter Free Track page and uncheck “Use Free Track Data” checkbox in that page.
The third column shows the time in milliseconds that the program takes to complete this subroutine.
Servos Data
This timer controls the refreshing time of the gauges driven by servos, aircores and/or steppers. Be aware that, even if you set this timer to 0, the gauges won’t move until the data of the sim is read, which is controlled by the Sim Data timer. Thus, this timer shouldn’t be lower than the Sim Data Timer.
For troubleshooting purposes, you can tell the program to skip this subroutine by unchecking the “Enbl” checkbox. The checkbox value is not saved in the configuration file, and it will show up as checked as soon as you run PSCockpit again.
The third column shows the time in milliseconds that the program takes to complete this subroutine and the led indication shows when the program is running it.
Delay Between Cycles
This timer controls the time to run another cycle. This time is needed to setup some configurations internals as the 8x4 matrix cycle.
Flash Lights Timer
This timer controls the time of flashing for the outputs configured as “Flash Leds” in the IO Layout.
Keystrokes Timer
PSCockpit sends the commands to your simulator by means of virtual keystrokes. This timer controls the time that the virtual keystrokes are held as pushed. Some of the tested sims doesn’t react when sending a simple tick of a key combination. If this is the case, increase this timer until the sim react to your commands.
BCD Timer
When using BCD combinations, the diodes and electronics need some setup time. This timer controls the time from the physical action of pushing a pushbutton of a BCD matrix and the reading time of PSCockpit. Thus, this timer avoids phantom inputs as well as wrong commands sent to the simulator. Be aware that you will need to hold down the pushbutton all the amount of time set in this timer for PSCockpit to react.
Pushbuttons Timer
As well as the BCD timer, this timer controls the time from the physical action of pushing a single pushbutton and the reading time of PSCockpit. Thus, this timer avoids phantom inputs as well as wrong commands sent to the simulator. Be aware that you will need to hold down the pushbutton all the amount of time set in this timer for PSCockpit to react.
Reset Timers to Default
Self-explanatory.
High Elapsed Time symptom’s
If any of the elapsed times are much higher than expected, it can be a symptom of a bad configuration of PSCockpit system. Some of them are as follows:
- High Sim Data elapsed time: Check the I/O Data elapsed time and the LCD’s elapsed time. If any of these show high values, disable the affected subroutine by unchecking the corresponding check box and watch the effect on this elapsed time. High elapsed times of this timer alone reflects a communication problem with the sim. It may be caused of wrong versions of PSCockpit and/or the sim. Low PC specs can cause this symptom also.
- High I/O Data elapsed time: This is normally caused by a wrong configuration of a pcb, a faulty pcb, or a misconfiguration of one pcb. Review your I/O Layout and test your pcb’s one by one to detect any faulty one.
- High LCD’s elapsed time: This is normally caused of a wrong configuration of a faulty LCD or Adafruit OLED. Review your LCD`s configuration and Adafruit OLED configurations and test one by one by disabling all the others displays. This operation can be accomplished by unchecking the “Enable” checkbox for each display in the “LCD” and “Adafruit OLED” pages.
- High I/O Data and LCD’s elapsed times: This is a symptom of problems in the USB connector/cable or USB drivers. Check the troubleshooting guide here: link
- High Servos Data elapsed time: This is normally caused of a wrong configuration of a faulty servo, Aircore or stepper motor. Review your gauges configuration on “Gauges” and “Stepper Motors” pages and test one by one by disabling all the other gauges by unchecking the “Enable” checkbox for each gauge.
Regards,
Shep
