
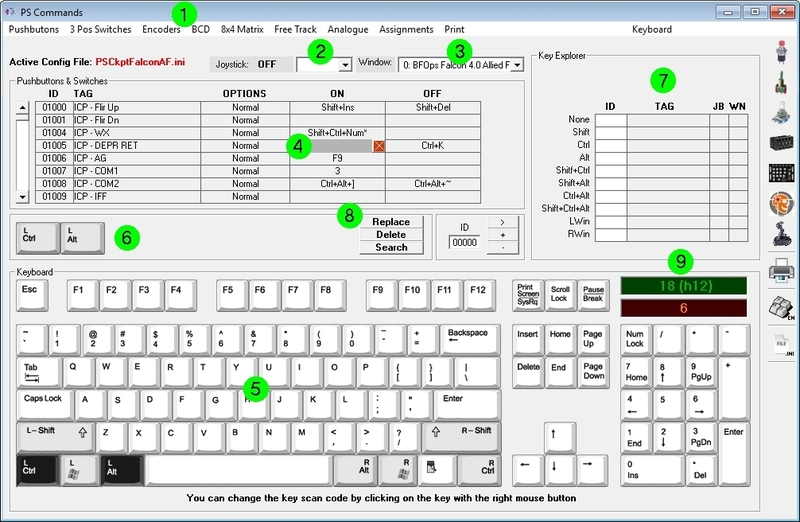
The key stroke sequence to be sent to the sim is defined in the Command page of the PSCockpit software. To set an specific command for each physical input element, follow this procedure:
- Select type of input element (pushbutton, switch, ...) by clicking in the upper menu.
- Select the joystick DX pushbutton in the dropdown list if you want to want to send a different key stroke combination while pressing the joystick button. If you want to send the key stroke combination without pressing any DX pushbutton of your joystick, select blank from the drop down list.
- Select the Window name of the application you want to send the key stroke combination to. To fill the name list of application windows read the following post: HOW TO Assign Key Strokes to Different Applications. Of course, the most important window name will be your favorite sim!.
- Select the position inside the matrix in which you want to place the key combination. A grey field will appear on that position.
- Select the key stroke combination by clicking on the keyboard or directly from your keyboard.
- The key stroke combination will appear in the middle frame.
- You can review in the Explorer frame if you have already assigned the key stroke.
- Click on "Replace" and the key combination will be transferred to the selected position of the matrix. If you click on "Delete" the key stroke combination will be deleted from the selected position of the matrix. If you click on "Search" the key combination will be searched in the matrix and if it is found in any position, it will be showed in the first line of the matrix.
- You can see the decimal and hexadecimal values of the key in the green frame and also the key codes for Falcon in the orange frame where you can copy by clicking on it.
If you have another keyboard or the key is not working correctly in your sim, you can reassign the control code of the key by clicking on the desired key with the right button of the mouse. A box will appear asking for the new key code in decimal format:
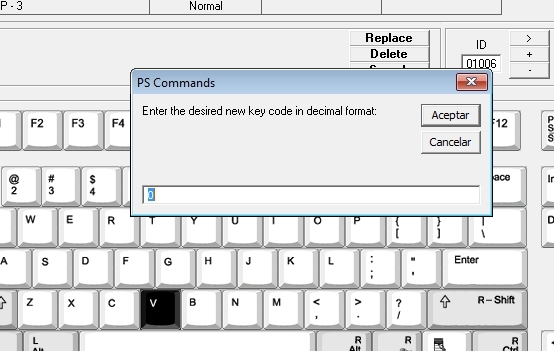
You can read the procedure in the following post: HOW TO Assign Commands from Falcon BMS Key File
KEY STROKE OPTIONS
Some of the input devices have key stroke options. The explanation of those is the following:
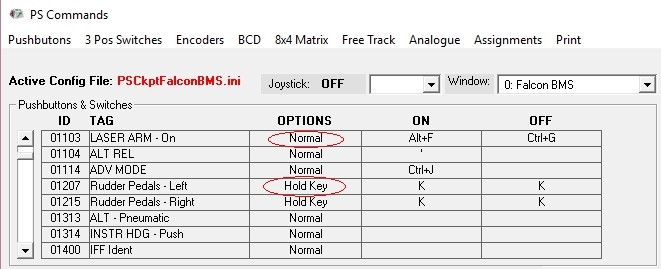
Pushbutton and Switches:
- Normal: Each time the input is activated the ON key stroke sequence is sent to the designated window. Each time the input is deactivated the OFF key stroke sequence is sent to the designated window.
- Hold key: The stoke sequence is sent continuously until the input is deactivated. You must stablish the same key stroke sequence in either ON and OFF fields.
3 Pos Switches:
- POS 1: When the 3 position switch is activated in position 1 the key stroke sequence is sent to the designated window.
- POS 2: When the 3 position switch is activated in position 2 the key stroke sequence is sent to the designated window.
- CENTER: When the 3 position switch is deactivated (center position) the key stroke sequence is sent to the designated window.

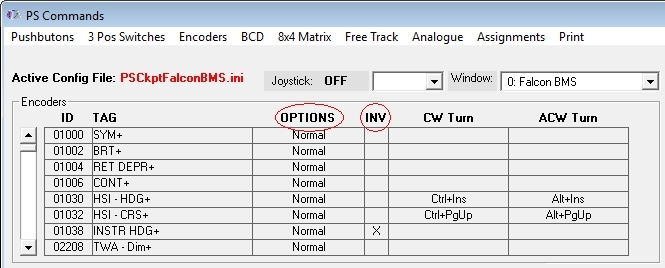
Encoders:
- Normal: When the encoder is rotated clockwise direction, the key stroke sequence under CW Turn will be sent to the designated window. Likewise, when the encoder is rotated counterclockwise direction the key stroke sequence under CCW Turn will be sent to the designated window
- Pulse: Reserved for future use.
- INV: When the INV tick is checked, the key stroke sequence sent to the designated window will be the opposite of the turning direction. This option allows to avoid rewiring of the encoder in case is reversed.
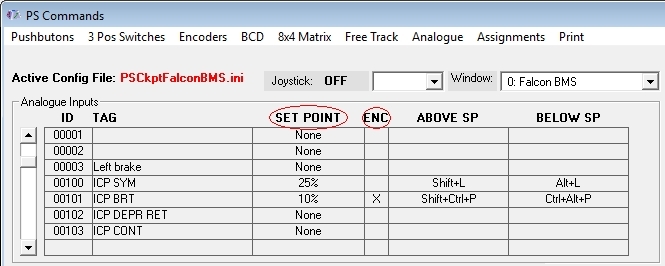
Analogue Inputs
When using pots in the PSCockpit system you can modify their behavior by selecting one of the following options:
- SET POINT: By selecting a set point, a single key stroke sequence under Above SP will be sent to the designated window whenever the set point is bypassed by the analogue signal. Likewise, a single key stroke sequence will be sent to the designated window whenever the analogue signal goes under the stablished set point. The set point options are 5%, 10%, 25%, 50%, 75%, 90% and 95% of the analogue input total scale. This feature is useful to replicate by software the on/off switch functionality for pots with no such switch.
- ENC: By ticking the ENC check box, the pot will act as an encoder, sending the key stroke sequence under Above SP to the designated window each time the analogue signal bypass the amount in % established in the Set Point. Likewise, the Below SP key stroke signal will be sent to the designated windows whenever the analogue signal lower that amount in %.
Kind regards,
Shep
No comments:
Post a Comment